Work with chat sessions in VS Code
Use chat in Visual Studio Code to have conversation-based AI interactions. A chat session consists of the sequence of prompts and responses between you and the AI, along with any relevant context from your code or files. This article describes how to create and manage chat sessions, use the sessions list, and organize your sessions. These features work in both the Chat view and the Agents window.
Start a new chat session
When you start a new chat session, you begin a new conversation with the AI. Each session has its own context window and can run with a different agent type. You can run multiple sessions in parallel, each focused on a different task or topic. Use the sessions list to monitor and switch between different sessions.
Start a new chat session when you want to change topics to help the AI provide more relevant responses.
Depending on how you prefer to work or the task you want to accomplish, you can choose between different chat experiences in VS Code. Each experience is optimized for different workflows, but they share the same underlying sessions to enable you to switch between them at any time.
The Agents window is a dedicated window for orchestrating agents across multiple projects from a single place. Chat is your primary interface where you assign high-level tasks to agents. The Agents window is optimized for agents-first workflows.
To start a new chat session in the Agents window:
-
Open the Agents window by selecting the Open in Agents button in the VS Code title bar.
-
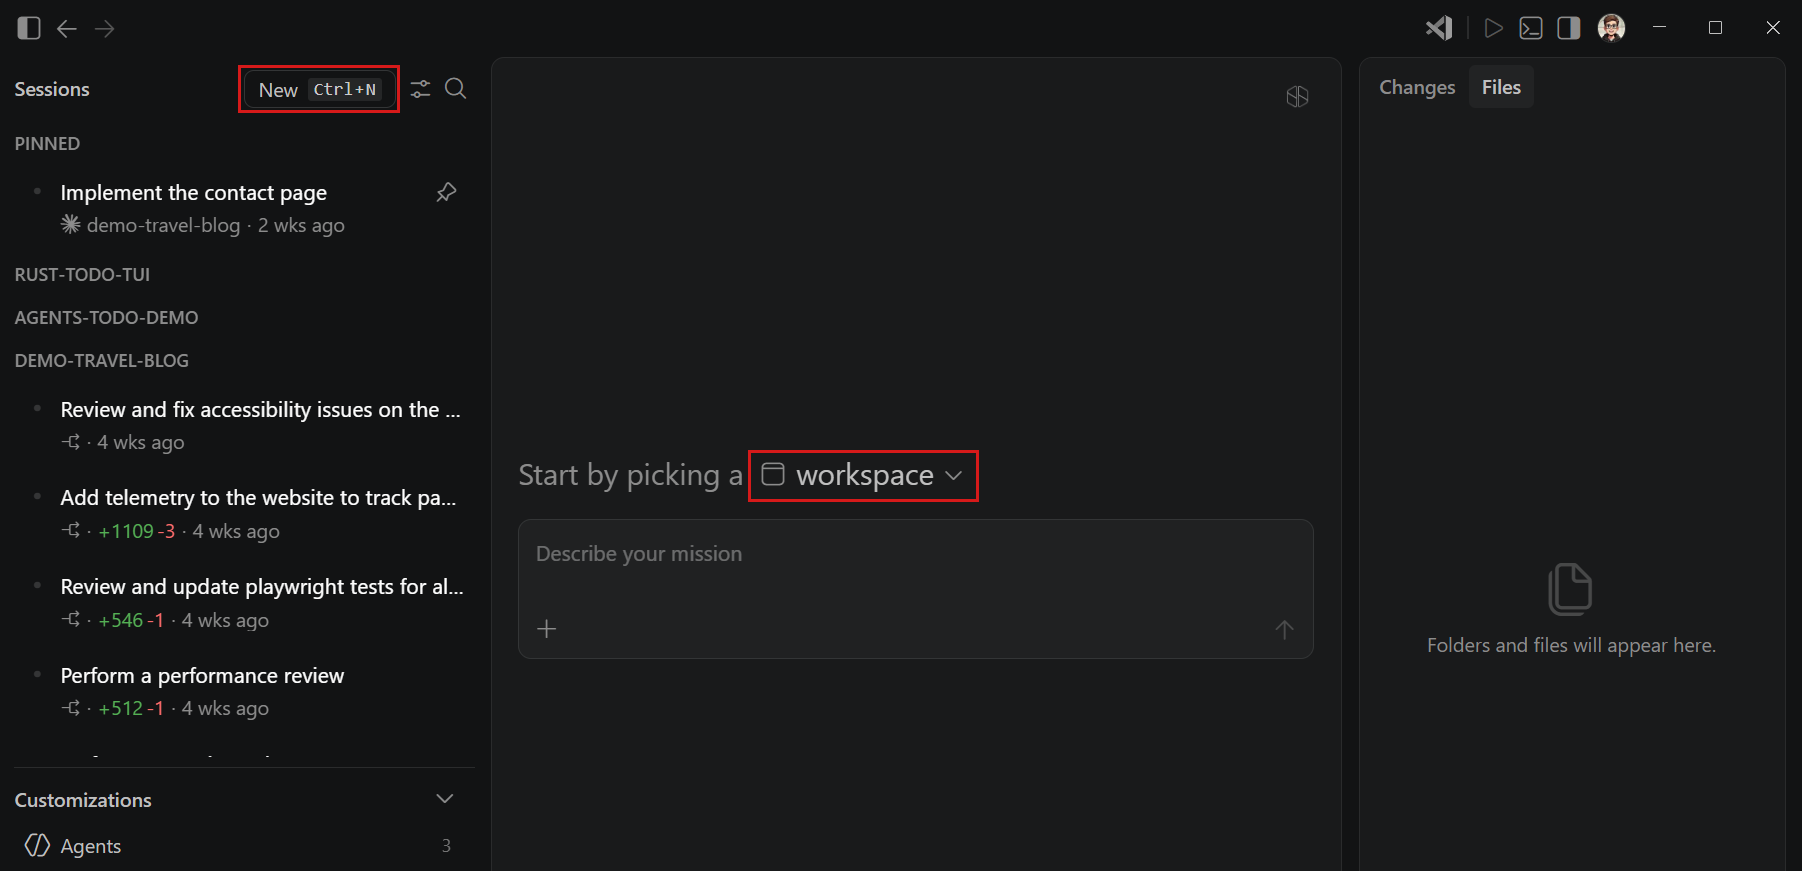
Select New in the sidebar to create a new session.
-
Choose the workspace or repository for the session, as the Agents window can target any of your projects.
-
Choose an agent type from the dropdown to indicate where the agent session runs and how it operates.
You can choose from local, Copilot CLI, Cloud, or third-party. Learn more about agent types.
-
Optionally, select additional configuration options for the session:
-
Agent: determines the role or persona of the AI, such as Agent, Plan, or Ask. Learn more about choosing an agent.
-
Permission level: controls how much autonomy the agent has over tool approvals. Learn more about permission levels.
-
Language model: determines which AI model powers the conversation. Learn more about language models in VS Code.
-
-
Type your prompt and press Enter to submit it. The agent's response appears in the chat area, and the agent may take actions such as editing files, running commands, or asking follow-up questions.
The Chat view is a chat panel that sits in the sidebar alongside your workspace editor tabs. Agents assist you with coding tasks, while you have full access to VS Code's rich coding experience. The Chat view is optimized for code-first workflows.
To start a new chat session in the Chat view:
-
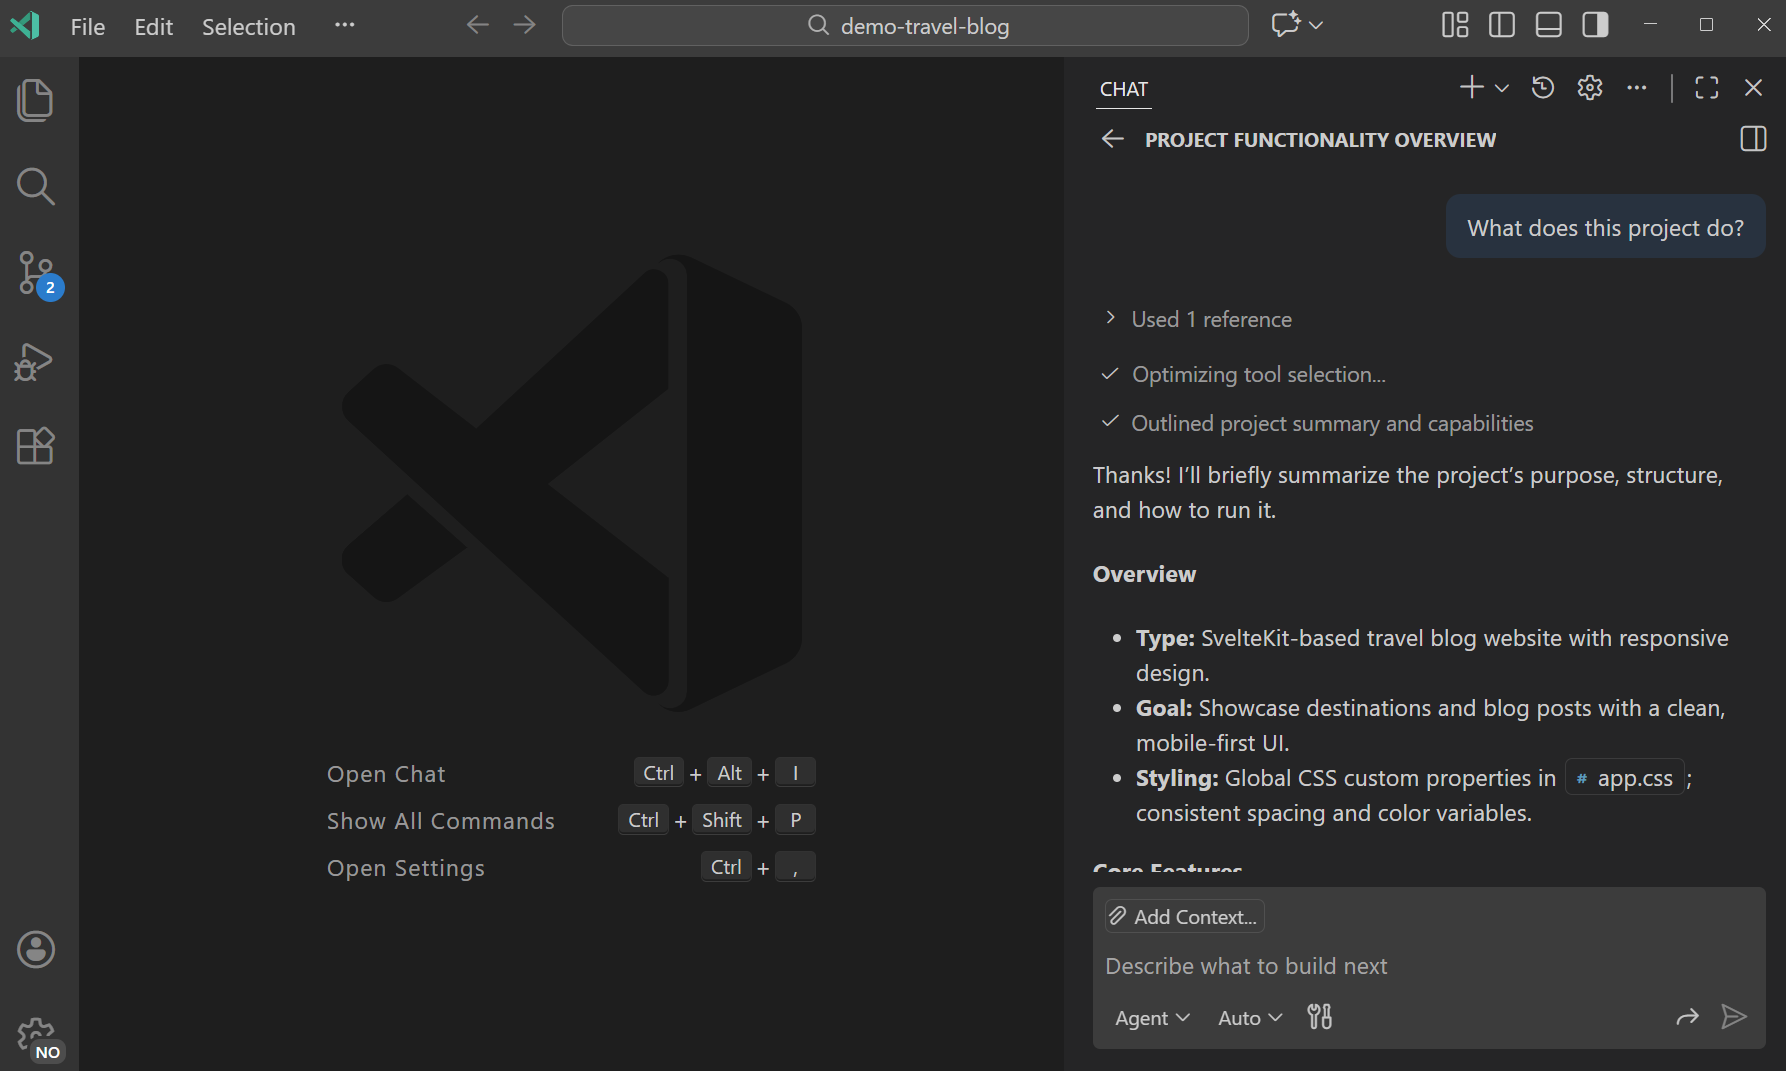
Open the Chat view by selecting the Chat icon in the VS Code title bar.
-
Create an empty session by selecting the New Chat (
+) button.The session is scoped to the current workspace, so if you have a workspace open, the session is automatically linked to that workspace.
-
Choose an agent type to determine where the agent session runs and what capabilities it has access to.
You can choose from local, Copilot CLI, Cloud, or third-party. Learn more about agent types.
-
Optionally, select additional configuration options for the session:
-
Agent: determines the role or persona of the AI, such as Agent, Plan, or Ask. Learn more about choosing an agent.
-
Permission level: controls how much autonomy the agent has over tool approvals. Learn more about permission levels.
-
Language model: determines which AI model powers the conversation. Learn more about language models in VS Code.
-
-
Type your prompt and press Enter to submit it. The agent's response appears in the chat area, and the agent may take actions such as editing files, running commands, or asking follow-up questions.
Sessions list
The sessions list is your central hub for managing all your chat sessions, regardless of where you started them or where they are running. The sessions list shows your sessions with information about their status, type, and file changes.
Hover over a session to see actions for pinning or archiving it. Right-click a session in the list to see additional actions like deleting or changing the session's state. Some actions are specific for the session's agent type and state. For example, checking out a pull request for a cloud agent session.
Use the pinning action to keep important sessions easily accessible at the top of your list. Pinned sessions stay at the top of the list regardless of their activity or state, so you can quickly find and return to them.
In the Agents window, the sessions list is located in the left sidebar. It shows sessions from all your workspaces, so you can monitor work across projects from a single place. Each session item surfaces key information such as session name, workspace, agent type, and file change stats.
By default, the list is filtered to only show active sessions. You can change the filter to show sessions of different states, such as completed or archived.
Sessions are grouped by workspace by default, and you can switch the grouping to organize by timeframe instead.
You can hide the left sidebar by selecting the Toggle Sidebar button in the top-left corner of the Agents window or by using the ⌘B (Windows, Linux Ctrl+B) keyboard shortcut.
In the Chat view, the sessions list is scoped to your current workspace and groups sessions by time period, such as Today or Last Week. If you don't have a workspace open, the list shows all sessions across your workspaces.
By default, the list is filtered to only show active sessions. You can change the filter to show sessions of different states, such as completed or archived.
To hide the session list from the Chat view, right-click in an empty chat and unselect Show Sessions or use the chat.viewSessions.enabled setting.
The Chat view operates in two modes: compact and side-by-side. You can manually switch between compact and side-by-side mode by using the toggle control in the top-right corner of the Chat view.
-
Compact: The list of sessions is embedded in the Chat view. When you select a session from the list, the Chat view switches to that session. Use the back button to return to the sessions list.
-
Side-by-side: The list of sessions is shown side-by-side with the Chat view. Select a session from the list to view its details in the Chat view. You can further configure the orientations with the chat.viewSessions.orientation setting.
Extension developers can learn how to integrate with the sessions view by using the proposed API chatSessionsProvider. The API is currently in a proposed state and subject to change.
Archive sessions
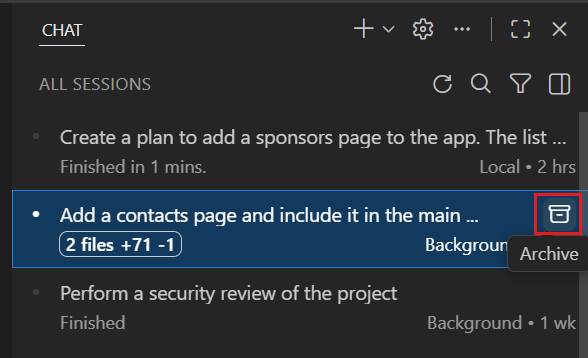
To keep the sessions list organized, archive completed or inactive sessions. Archiving a session does not delete it but moves it out of the active sessions list. At any time, you can unarchive a session to restore it to the active sessions list.
To archive a session, hover over the session in the sessions list and select Archive. After you archive a session, it disappears from the list. Inversely, you can also unarchive a session in the same way.
To view your archived sessions, use the filter options in the sessions list and select the Archived filter.
Delete sessions
To permanently delete a session, right-click the session in the sessions list and select Delete. Deleting a session removes it permanently and can't be undone. For Copilot CLI sessions, deleting the session also removes any associated worktrees created for that session.
If multiple Copilot CLI sessions share the same worktree, such as after you fork a session, deleting one session does not remove the shared worktree while another session still uses it. The worktree is removed only after the last linked session is deleted or archived.
Deleting a session is irreversible. If you just want to hide a session, consider archiving it instead.
Fork a chat session
Forking a chat session creates a new, independent session that inherits the conversation history from the original session. The forked session is fully separate from the original, so changes in one session do not affect the other. The new session title is prefixed with "Forked:" to help you identify it.
For Copilot CLI sessions that use worktree isolation, the forked session continues to use the same worktree as the original session.
Forking is useful when you want to explore an alternative approach, ask a side question, or branch a long conversation in a different direction without losing the original context.
There are two ways to fork a chat session:
-
Fork the entire session: type
/forkin the chat input box and press Enter. A new session opens with the full conversation history copied from the current session. -
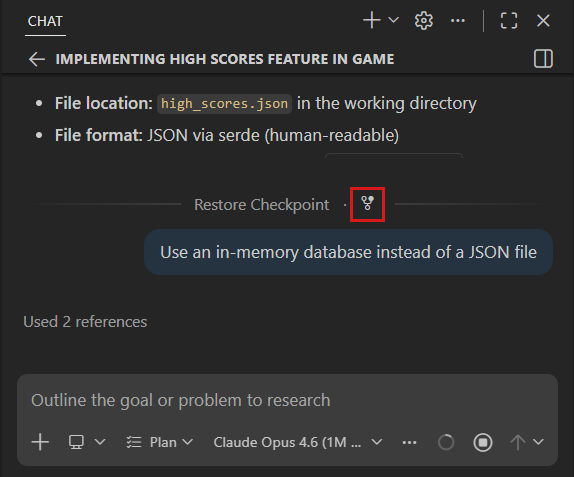
Fork from a checkpoint: hover over a chat request in the conversation and select the Fork Conversation button. A new session opens that includes only the requests up to and including that checkpoint.
Save and export chat sessions
You can save chat sessions to preserve important conversations or reuse them later for similar tasks.
Export a chat session as a JSON file
You can export a chat session to save it for later reference or share it with others. Exporting a chat session creates a JSON file that contains all prompts and responses from the session.
To export a chat session:
-
Open the chat session you want to export in the Chat view.
-
Run the Chat: Export Chat... command from the Command Palette (⇧⌘P (Windows, Linux Ctrl+Shift+P)).
-
Choose a location to save the JSON file.
Copy chat messages as Markdown
The Chat view supports different options for copying chat messages as Markdown to the clipboard, available through the context menu when you right-click a message or the chat background.
-
Copy: Copy an individual prompt or response to the clipboard - the Markdown contains the response text, thinking steps, and tool calls.
-
Copy All: Copy the entire chat session in Markdown format, including all prompts, responses, thinking steps, and tool calls.
-
Copy Final Response: Copy just the final Markdown section of the agent's response, after the last tool call. This is useful for sharing or reusing the final output without the intermediate steps.
Session status indicator (Experimental)
The session status indicator provides quick access to your sessions directly from the command center in the title bar. The indicator displays visual badges for unread messages and in-progress sessions, so you can stay informed about AI activity without switching views.

The indicator shows:
- Unread sessions badge: shows the count of chat sessions with new messages. Select the badge to filter the sessions list to show only unread sessions.
- In-progress sessions badge: shows the count of sessions with running agents. Select the badge to filter the sessions list to show only in-progress sessions.
- Sparkle icon: provides quick access to chat and session management options.
You can configure the status indicator's visibility by using the chat.agentsControl.enabled setting.
View sessions on the VS Code welcome page
The VS Code welcome page can act as your startup experience for working with chat sessions. It provides quick access to your recent chat sessions, an embedded chat widget for starting new tasks, and quick actions for common tasks.
To configure the VS Code welcome page as your startup experience, set
workbench.startupEditor
to agentSessionsWelcomePage.