Background agents in Visual Studio Code
The term "background agent" might also appear as "Copilot CLI" or "worktree" in the VS Code interface while an experiment is being run.
Background agents in Visual Studio Code are CLI-based agents, such as Copilot CLI, that run in the background on your local machine. They operate autonomously while you continue other work in the editor. Background agents use Git worktrees to work isolated from your main workspace and prevent conflicts with your active work.
This article covers the key features of background agents, and how to start and manage background sessions from Copilot CLI.
Third-party providers like OpenAI Codex also offer background agent capabilities. Learn more about third-party agents.
What are background agents?
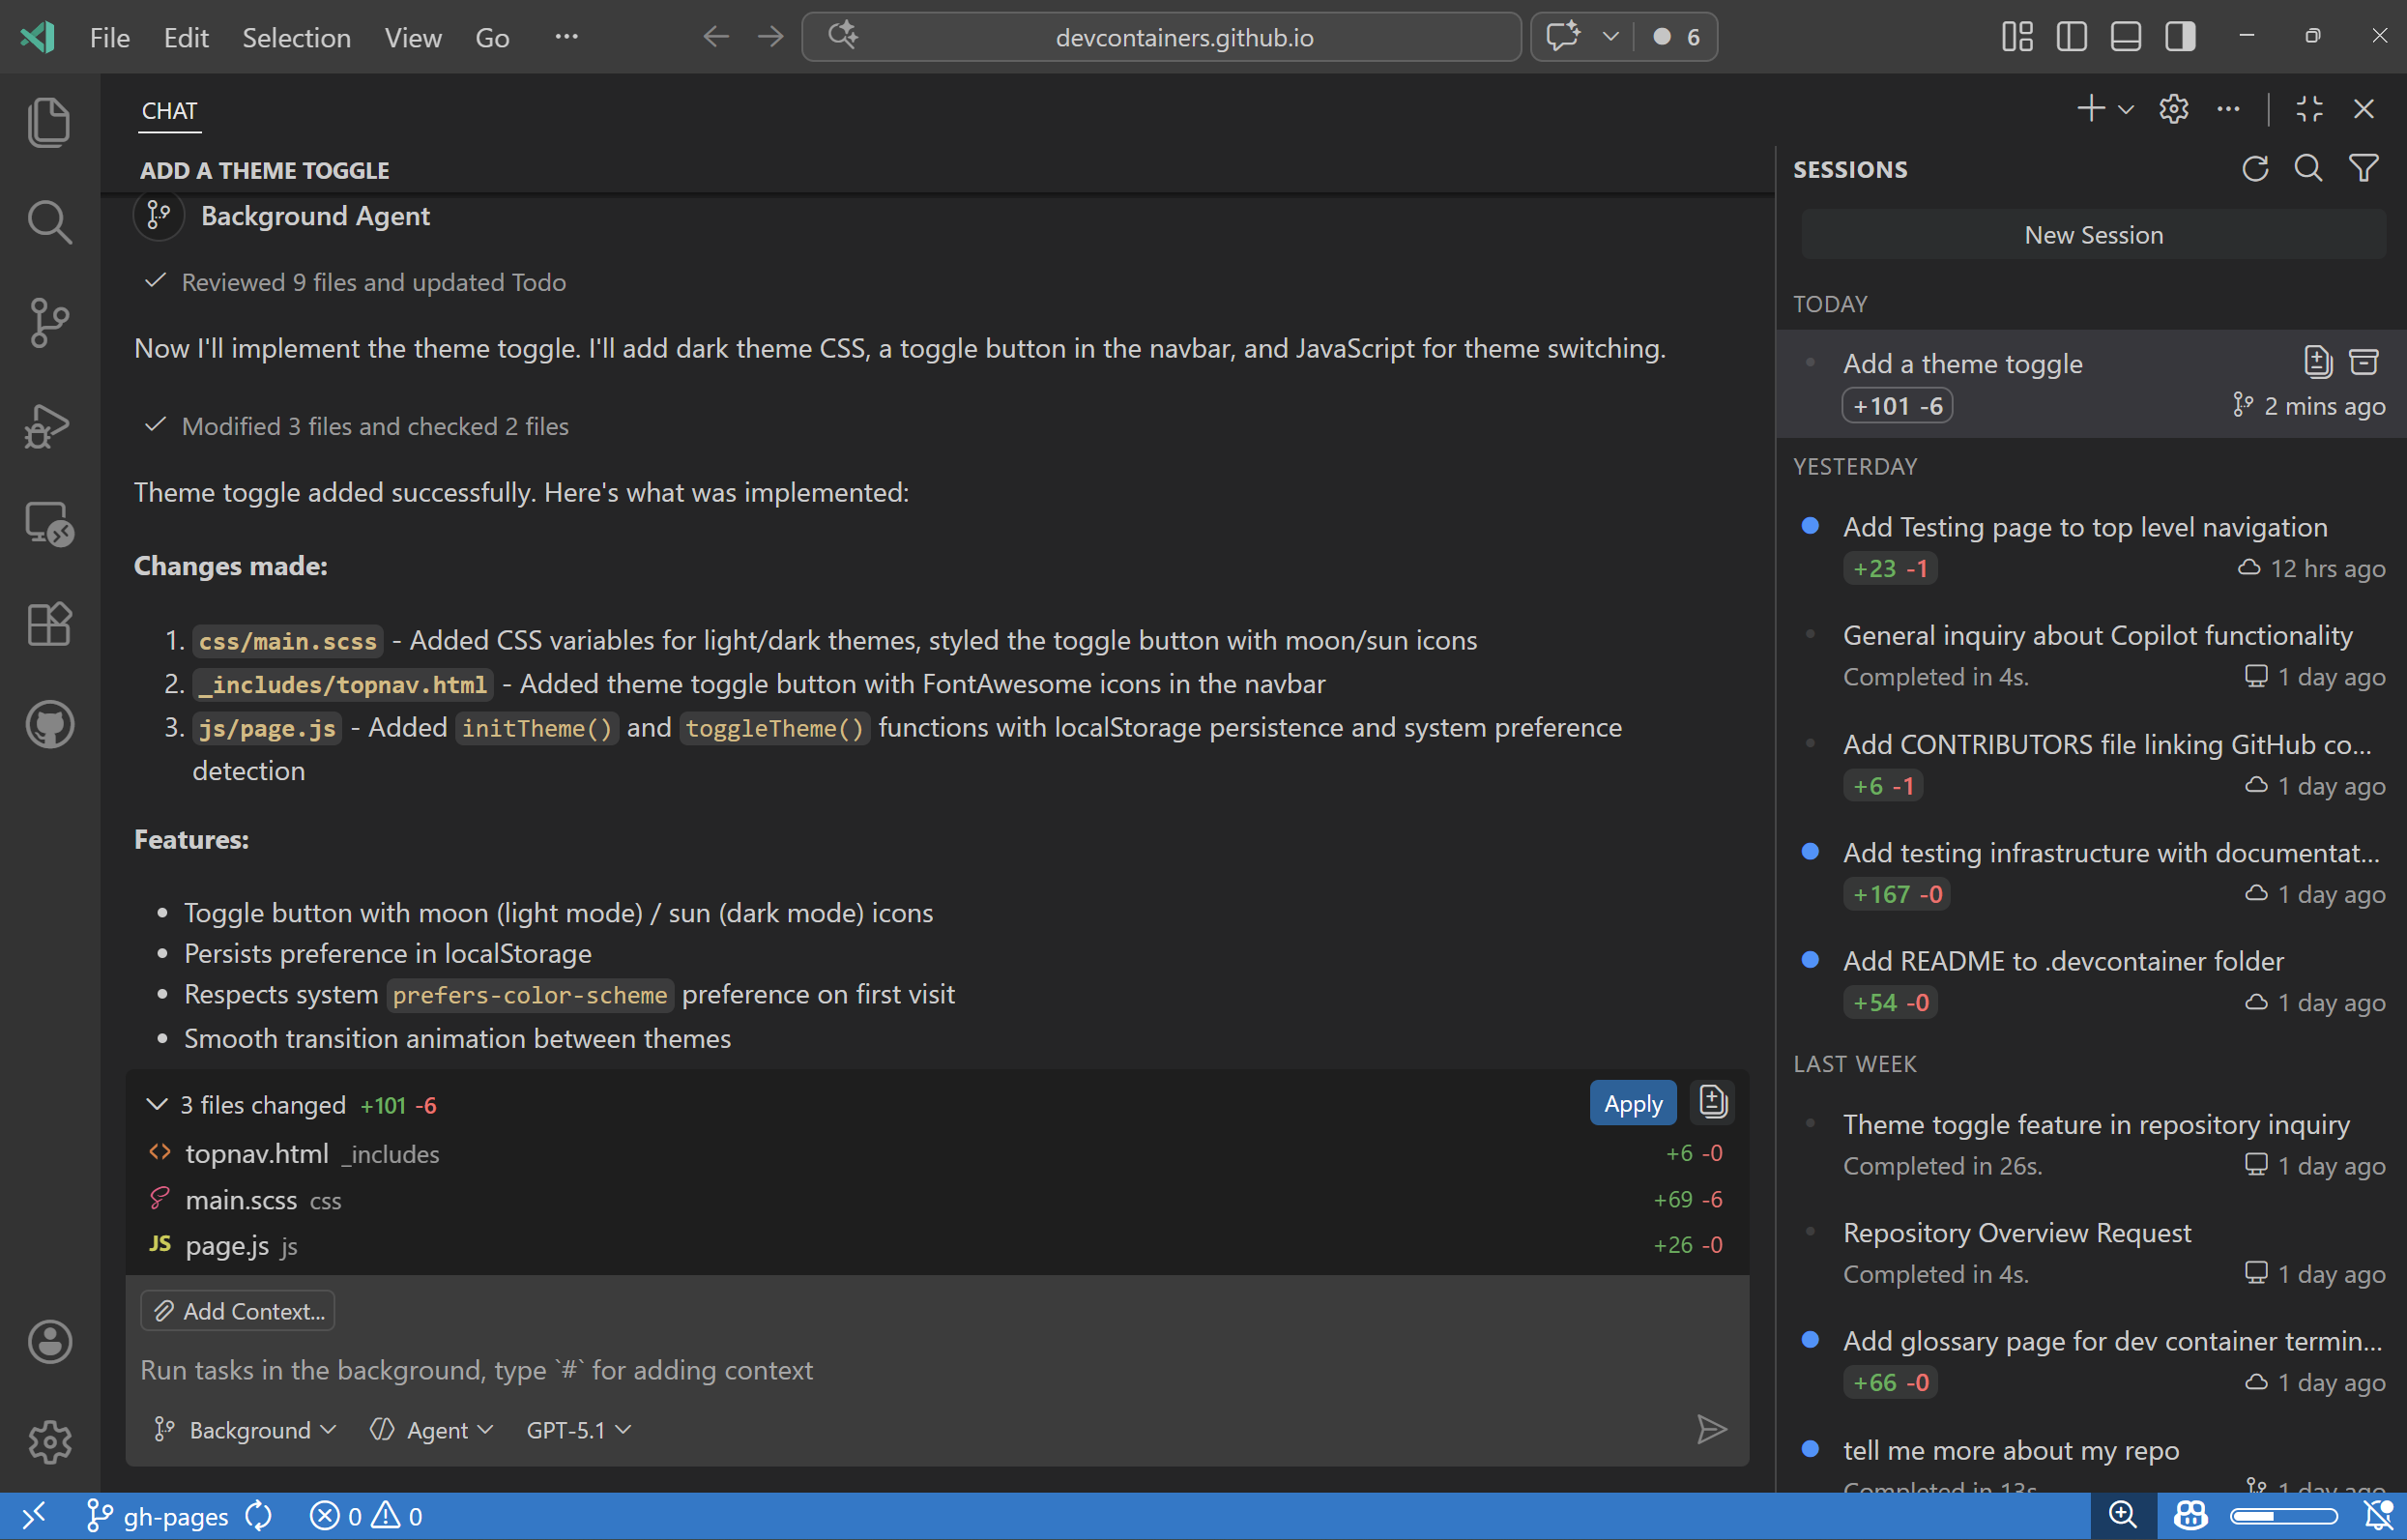
Unlike local agents that operate in and have aware of VS Code's editor context, background agents run independently via command-line interfaces (CLIs) on your local machine. You can view and manage all your background agent sessions from the unified Chat view in VS Code. This view also lets you create new background agent sessions directly from VS Code or hand off local agent conversations to background agents.
Because background agents run in the background without user interaction, they are well-suited for tasks that have a well-defined scope and all necessary context. Examples include implementing a feature from a plan, creating multiple variants of a proof of concept, or implementing clearly defined fixes or features.
You can start a new background agent session directly in chat by choosing the background session type. Alternatively, you can hand off a local session to a background agent for continuation in the background.
To prevent interference with your active work in the editor, background agents use Git worktrees to run in an isolated environment where they make changes without affecting your main workspace. When you start a background agent session, VS Code automatically creates a separate folder for that session.
Limitations of background agents
- Background agents can't directly access VS Code built-in tools and run-time context (like failed tests or text selections), unless you explicitly add that context to the prompt.
- Don't have access to extension-provided tools and are limited to the models available via the CLI tool.
- Can currently only access local MCP servers that don't require authentication.
Copilot CLI
The Copilot CLI is the primary background agent in VS Code. You can start and manage sessions from the Chat view or use the Copilot CLI directly from the VS Code terminal.
VS Code automatically installs and configures the Copilot CLI for you. When you start a session directly in the CLI, that session also appears in the sessions list, where you can track its progress and interact with it further.
Learn more about using Copilot CLI from the terminal or see the Copilot CLI documentation on GitHub.
View and manage background agent sessions
You can view and manage all your background agent sessions from the Chat view in VS Code. Filter the session list to show only background agent sessions by selecting the Background Agents from the filter options.
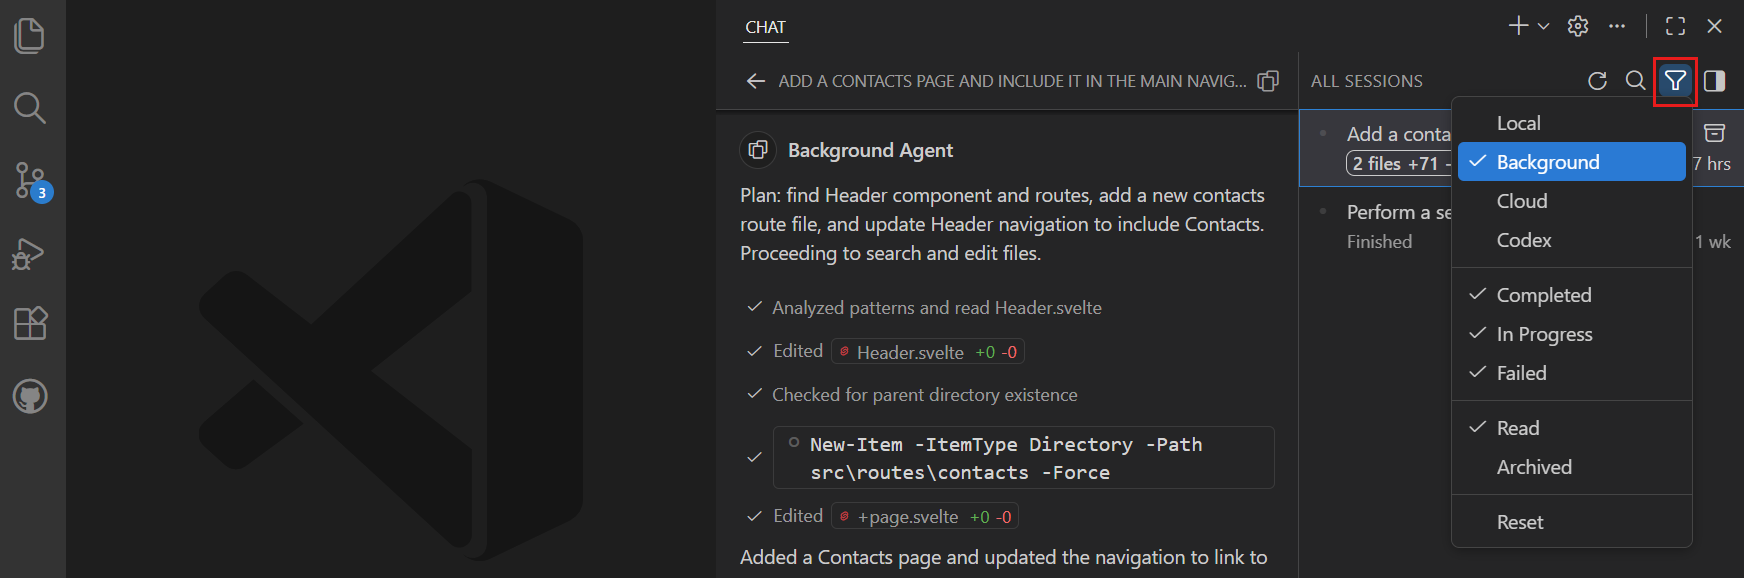
Select a background agent session from the list to open the session details in the Chat view. If you prefer to view the session in an editor tab (chat editor), right-click the session and select Open as Editor. You can also use the Copilot CLI from the terminal to interact with sessions.
Start a background agent session
Depending on your workflow, you can start background agent sessions in several ways. You can create a new session and provide the task details directly by using the CLI, or start a new session from the Chat view in VS Code.
Another approach - especially for complex tasks - is to first interact with a local agent in chat in VS Code, and once the scope and details are clear, hand off the task to a background agent session. For example, you might use the Plan agent to outline a multi-step feature implementation, then delegate the actual coding to a background agent.
Create a Copilot CLI background agent session
You can create a new Copilot CLI background agent session in VS Code in several ways:
-
From the Chat view:
-
Open the Chat view (⌃⌘I (Windows, Linux Ctrl+Alt+I))
-
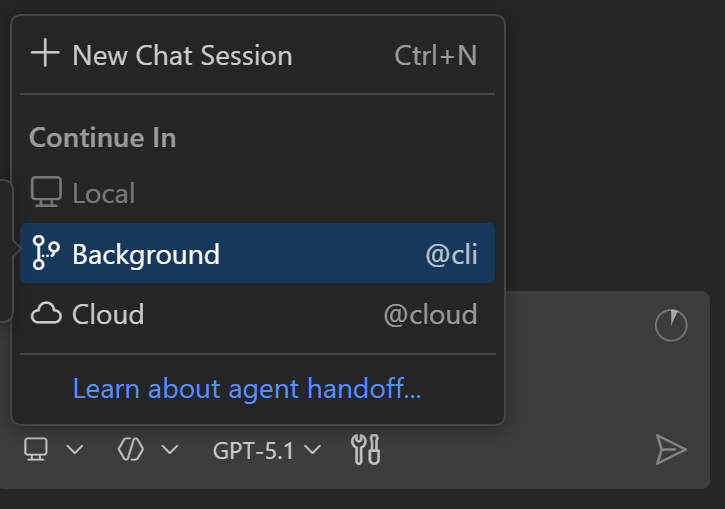
Select the Delegate Session dropdown > Background
-
-
While you're in a local chat session:
- Enter a prompt, select the Delegate Session dropdown > Background
-
Run the Chat: New Background Agent command from the Command Palette (⇧⌘P (Windows, Linux Ctrl+Shift+P))
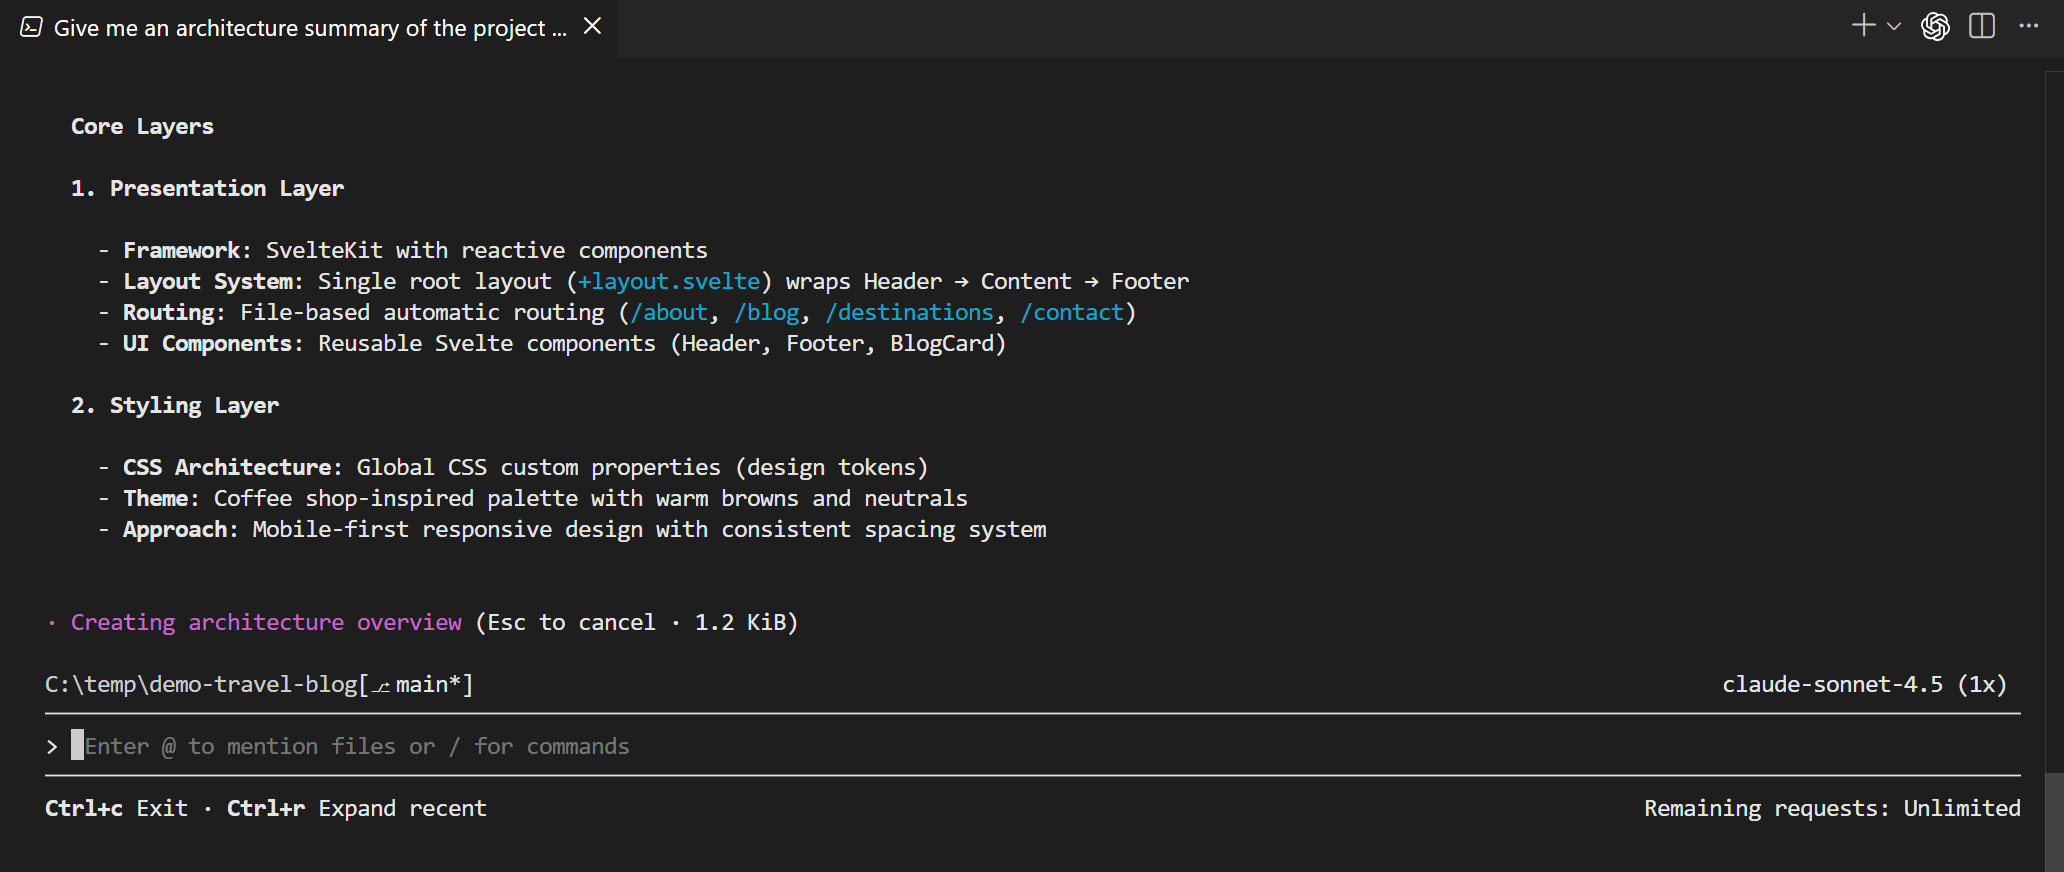
A new background agent session opens where you can provide additional task details and track the progress of the Copilot CLI session.
You can attach images in the chat input to provide visual context for a background session.
Hand off an agent session to a background agent
For complex tasks, it can be helpful to first interact with a local agent in VS Code chat to clarify requirements, then hand off the task to a background agent for autonomous execution. When you hand off a local agent conversation to a background agent session, the full conversation history and context is passed to the background agent.
To continue a local agent session in a background agent session:
-
Open the Chat view (⌃⌘I (Windows, Linux Ctrl+Alt+I))
-
Interact with a local agent until you're ready to hand off the task to a background agent
-
To hand off to a background agent, you have the following options:
-
Open the Delegate Session dropdown and then select Background
-
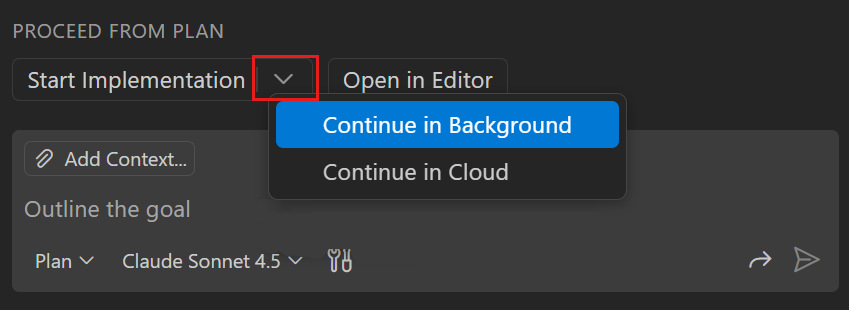
If you're using the Plan agent, select the Start Implementation dropdown and the select Continue in Background to run the implementation in a background agent session
-
The background agent session starts automatically, carrying over the full conversation history and context. You can monitor the background agent's progress in the Chat view.
Use Copilot CLI from the terminal
In addition to starting background agent sessions from the Chat view, you can use Copilot CLI directly from the VS Code terminal.
Open a Copilot CLI terminal
VS Code registers a GitHub Copilot CLI terminal profile that you can use to open a dedicated Copilot CLI terminal. You can open a Copilot CLI terminal in several ways:
-
Select the dropdown next to the + button in the Terminal panel and select GitHub Copilot CLI
-
Run the Chat: New CLI Session command from the Command Palette to open a Copilot CLI terminal in the panel, or run Chat: New CLI Session to the Side to open it in an editor tab beside your current editor
-
Run the Terminal: Create New Terminal (With Profile) command from the Command Palette (⇧⌘P (Windows, Linux Ctrl+Shift+P)) and select GitHub Copilot CLI
-
Type
copilotin any VS Code integrated terminal to start the Copilot CLI directly
The Copilot CLI terminal supports the following shells:
- bash and zsh on macOS and Linux
- PowerShell and Command Prompt on Windows
Start and resume sessions from the terminal
When you start a new session from the Copilot CLI terminal, VS Code automatically detects the session and displays it in the Chat view sessions list. You can then track progress, send follow-up prompts, or review changes from either the terminal or the Chat view.
To resume an existing background agent session in the terminal, right-click the session in the Chat view and select Resume Agent Session in Terminal.
VS Code automatically handles authentication for the Copilot CLI terminal, so you don't need to sign in separately.
Create background agent session
Background agent sessions automatically use Git worktrees to isolate changes from your main workspace. When you start a background agent session, VS Code creates a separate folder for the session. The background agent operates in this isolated folder, to prevent conflicts with your active work.
To start a background agent session with Git worktrees:
-
In the Chat view, select the Delegate Session dropdown and then select Background from the session type dropdown.
-
Enter a prompt to start the agent session. VS Code automatically creates a new Git worktree.
All changes made by the background agent are applied to the worktree folder, isolating them from your main workspace.
Background agents commit changes to the worktree at the end of each turn, so the session history stays aligned with the commit history.
TipYou can open the worktree for a background agent session by right-clicking it in the session list and selecting Open Worktree in New Window. You can also view the worktree in the Source Control view repository explorer (
scm.repositories.explorer).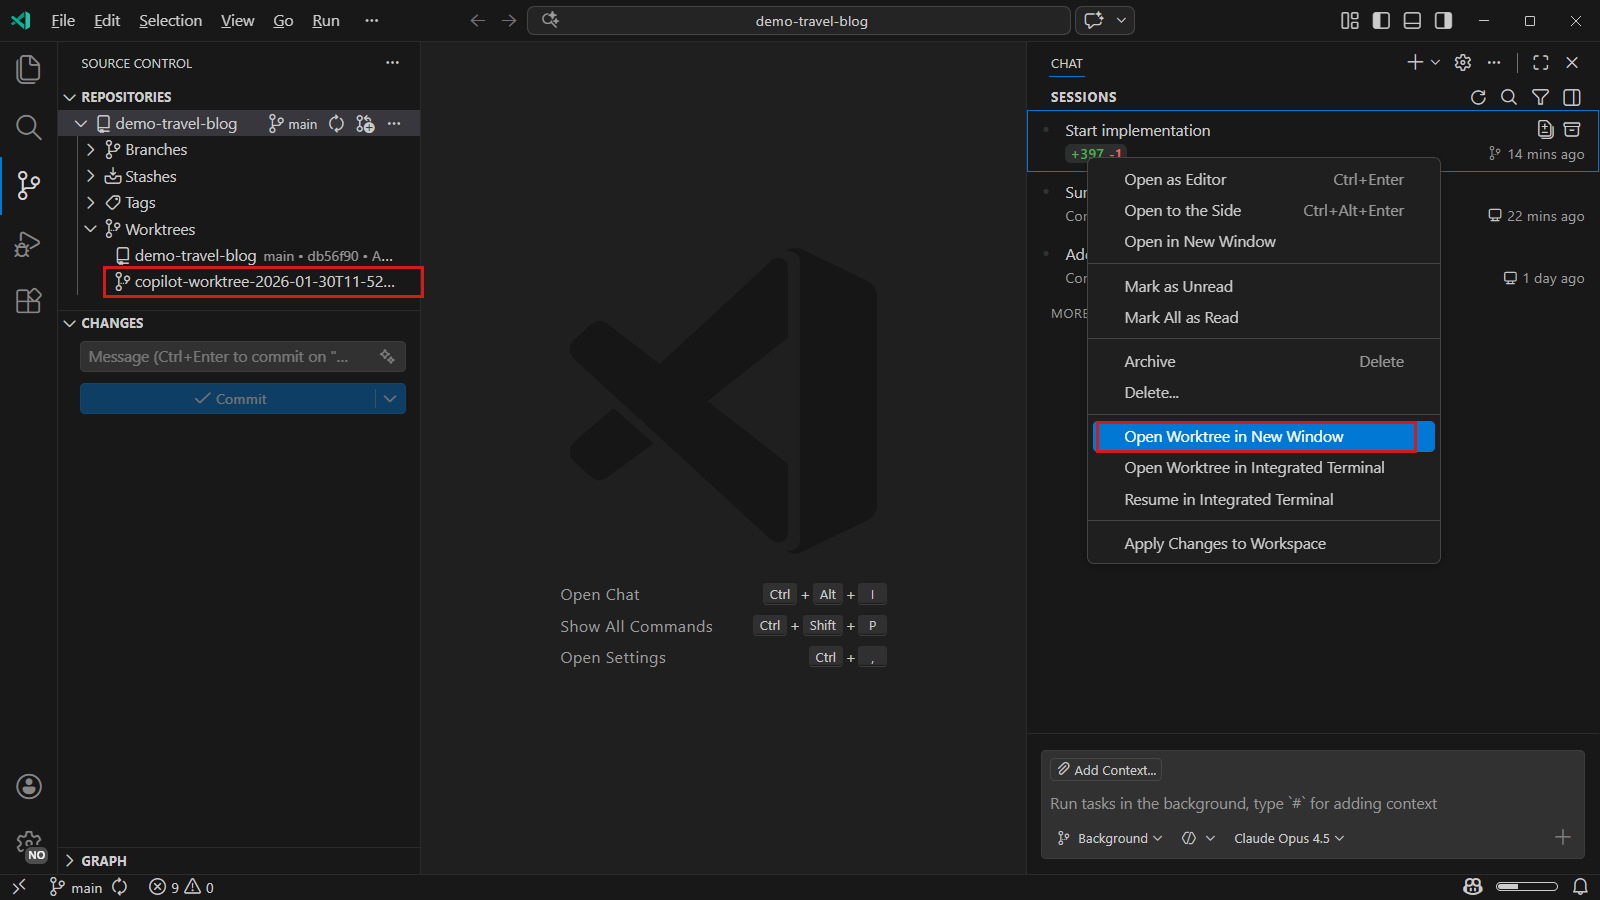
-
Monitor the background agent's progress in the Chat view. The agent sessions list displays diff statistics that match the changes in the worktree.
-
After the background agent completes the task, review and apply the changes from the worktree to your main workspace.
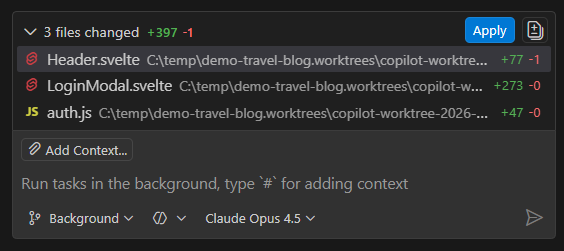
The working set at the bottom of the session shows the files changed during the background agent session and provides Apply and View All Changes actions.
-
When you apply changes, VS Code handles any conflicts with your working tree or staged files. If conflicts occur, a merge resolution experience helps you resolve them.
Learn more about using Git worktrees in VS Code source control.
Multi-repository workspaces
When your workspace contains multiple Git repositories, VS Code displays a repository picker in the chat input when you start a background agent session. Use this picker to select which repository the worktree should be created in.
After the session starts, the repository picker becomes disabled for that session. The worktree appears under the selected repository in the Worktrees node in the Source Control Repositories view.
To view all repositories in your workspace, enable the
Use custom agents with background agents (Experimental)
Custom agents let you define custom personas and roles for agents in VS Code. For example, you might create a custom agent for performing code reviews. Custom agents can define specific instructions and behaviors.
When you create a background agent session, you can select a custom agent to handle the task. The background agent operates according to the custom agent's defined behavior.
To enable custom agents with background agents:
-
Enable custom agents for background agents with the
github.copilot.chat.cli.customAgents.enabledsetting -
Create a custom agent in your workspace with the Chat: New Custom Agent command from the Command Palette (⇧⌘P (Windows, Linux Ctrl+Shift+P))
NoteCurrently, only custom agents defined in the workspace are available for background agent sessions. Learn more about creating a custom agent.
-
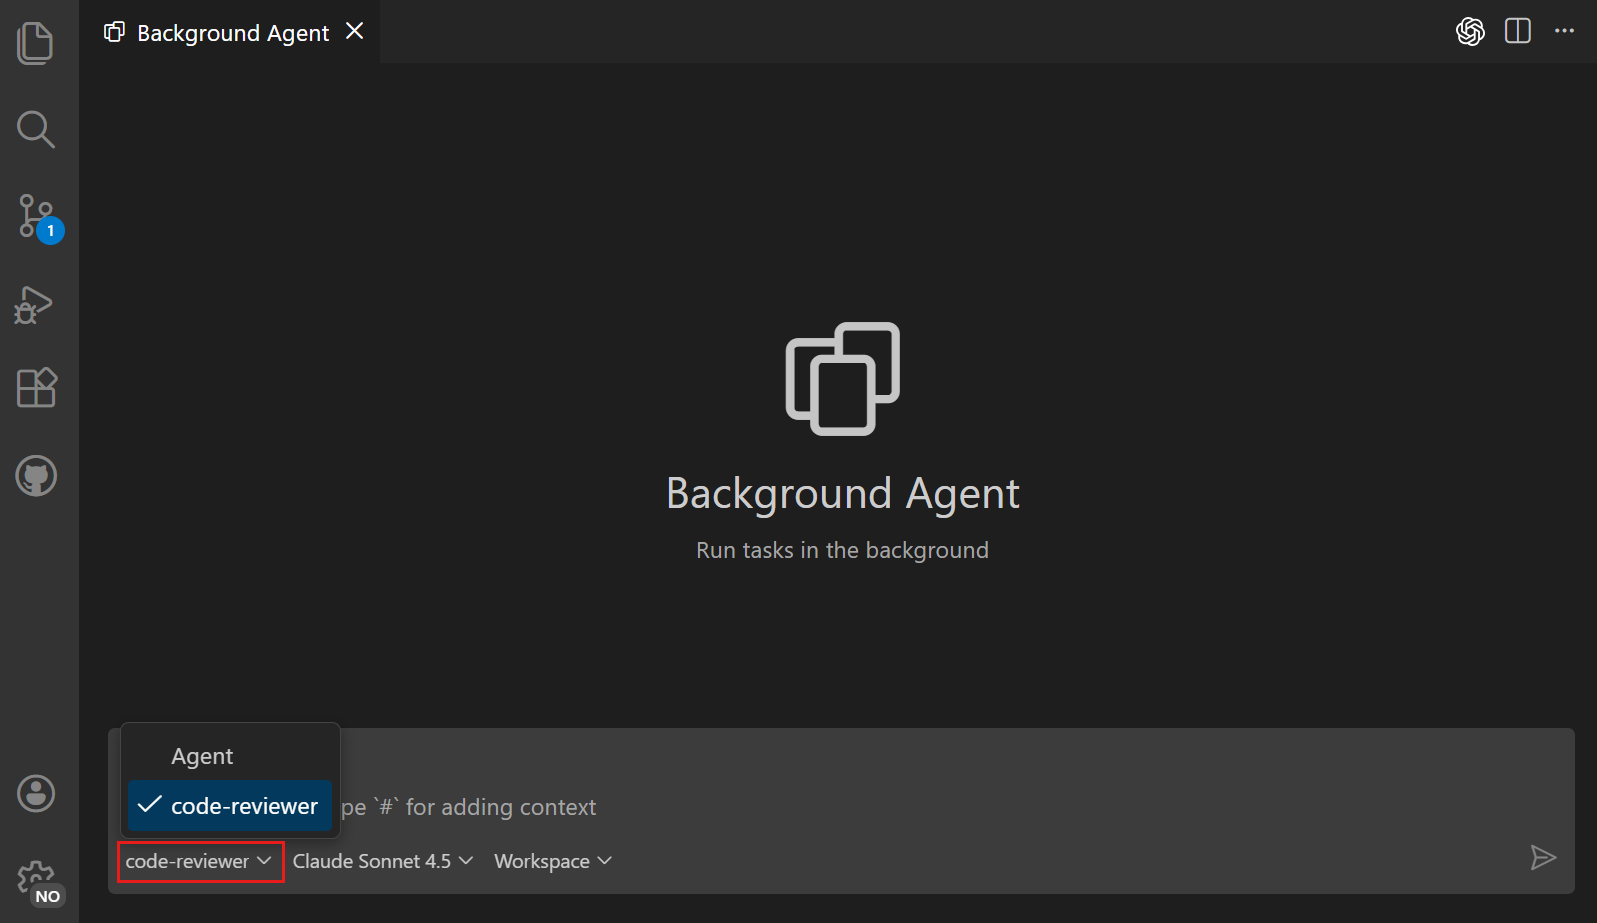
Create a new background agent session and select the custom agent from the Agents dropdown
-
Enter a prompt and notice that the custom agent is used to handle the task
Related resources
- Agents overview: Understand different agent types and how to hand off tasks between agents
- Third-party agents: Learn about OpenAI Codex and other third-party agent integrations
- Cloud agents: Learn about cloud agents for tasks requiring GitHub integration
- Custom agents: Create custom agent roles and personas
- GitHub Copilot CLI documentation